
The flight of Apollo 15 continues to be very special to me. I was very very lucky – my folks took me to florida and we visited the Kennedy Space Center. Later, we watched the Apollo 15 launch from Cocoa Beach. I remember that day very clearly watching the Saturn V cliimb into the sky and out over the atlantic. Everyone on the beach was focused on the launch and we could feel the beach shake as the shockwave traveled to cocoa beach.
I continue to be a space and astronomy nut. My day job has moved into 3D imagery and to help me learn more about the software (Lightwave on the MAC) i decided in my spare time to create models in my area of interest.....Apollo. In my university days, I studied cartography and was fascinated with shaded relief models.
My first "lightwave" Apollo model was the Apollo 16 landing site. I then textured the model with the actual orbital images Ken Mattingly shot while in orbit. I was thrilled to view the landing site from every vantage point including North Ray and Stone Mountain. It is so cool to look out over the valley and see features the astronauts would have seen. That led to me wondering what the landing site would have looked like from the astronaut's point of view flying in the LM. So the next step was modeling a LM. I followed a number of blueprints available from RealSpace models and built a very crude model. It was a blast animating the LM landing at the Descartes Highlands.
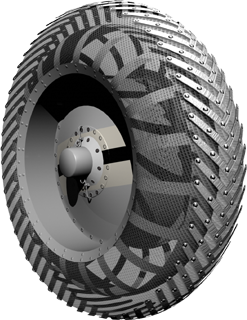
Of course that led me to wonder what the rover would have looked like traveling on the lunar surface. Looking into research material i found very little in way of accurate blueprints. So following early the few drawings I found and Kipp Teagues plethora of apollo images i embarked on my rover journey.
Months of spare time was spent modeling parts and guessing what went where. Many times it was 1 step forward and 2 steps back as parts came together and most of the time those pieces didn't fit with the other piece. Remodeling to fit those parts properly then led to the next parts of the puzzle. Images were a great help but i ultimately came as far as i could go with the material. I then decided to ask for outside help and posted my questions on the apollo news group. Karl Dodenhoff was and continues to be a huge supporter of my work and has shown me material that i was not aware of. He pushed me farther than i thought was possible. His imagery and diagrams allowed me to finish as best i could the rover you see now. It is still a "best guess" but a pretty good guess.
Internet help also led to my contact with Eric Jones of the Apollo Lunar Surface Journal. One e-mail asked if i would be interested in answering a question that has puzzled apollo folks for a number of years. The strange reflection on the high gain antenna that is visible in Harrison Schmitt's image of Gene Cernan. I matched as close as i could the image and rendered out a test image. The speculation on Eric's site figured that the sun was reflecting on the top of the tv camera and then onto the antenna mesh. The render of my model supported this hypothesis. I have included this image below.
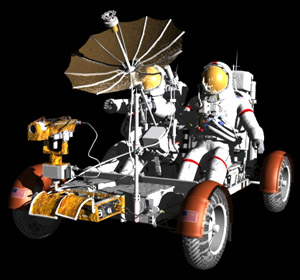
I sent my image to Eric and he put me in touch with Ron Creel who was looking to produce a rover driving simulation. Unbeknowst to me at the time, Ron was one of the original rover design team members and had always wanted to develop and produce a rover driving simulation. Eric's e-mail put us in touch with each other and we discussed what he wanted to accomplish. Ron sent me dozens of closeup images of the rover and thanks to him and to Karl, I was able to complete as best I could, the apollo 15 LRV-1. As Ron and I e-mailed I then found out more about his fascinating background with Apollo. What at thrill and honor it has been and continues to be to work with him. I then moved onto animating certain aspects of the rover, including the radiator section and the deployment procedures. At the same time, Ron contacted a number of sim companies and Stephan Guenther from Spacedomains came aboard to program ron's visions. Stephan, located in Germany continues to produce superb space simulation programs. Utilizing my model Stephan has produced a unique simulation rover driving program which gives the user a feel for what it was like to drive in 1/6 gravity on the moon. We continue to add elements to it and hope to have it ready very soon. Visit lurova.com
Some 7 months ago, Mark Gray of spacecraft films approached me as he wanted to use my rover model for a poster he was considering producing. I had wanted to do one for myself but never intended to offer it to the public. After thinking about it I then decided to try to produce it myself. That was an interesting journey. It meant having to up-rez the model as most parts were not meant to be seen at high resolution, especially in print. I started to think about what kind of poster I would have liked to see when I was growing up during the apollo days and designed a poster with that in mind. I wondered about copyright and using images from nasa on the poster. A few clicks on the internet connected me to NASA and I then realized that there were certain issues that I would have to address in regards to using astronaut's images. I originally had images that showed NASA employees and the astronauts, but there are rules stating one must contact each person that appears in an image and get their permission. Not knowing how long it would take to get in touch with the astronauts, then trying to identify NASA employees and my self imposed deadline to get the poster ready for the moon buggy races in Huntsville, I decided to drop their images all together. I was then left with a huge blank gap on the poster that needed filling. I decided to attempt to show the rover deployment procedure as my research showed it to be a marvelous and complicated collection of steps.
I then needed to build a highly detailed LM and also figure out the deployment procedure which included modeling the space support equipment (SSE). The actual rover was folded into 3 and the designers were very ingenious in their method of storing and unloading the rover from the side of the lm. My rover model really took on a whole other dimension when I began to animate it. When folding it into 3, the individual pieces that made up the rover, which previously didn't seem to relate to one another, began to make more sense and fit together beautifully. The model "spoke" to me and guided me into figuring out how things worked. Parts seemed to fit when the rover was just one big "unfolded" model, but when it actually folded in 3, pieces of it didn't connect or relate correctly with the other. I was forced to go back and re-examine images and videos to figure out what was missing or what I thought I saw.
One item in particular, the lobe cam, was one of the major revelations for my understanding of how the folding was accomplished. I watched the videos over and over and still didn't realize what was actually going on. What I thought I saw was not entirely correct. My animation was missing a key part. The animation told me that something else was necessary for the rover to pivot from the walking hinges on the SSE. I knew I had to look at a specific spot on the rover and find something that would allow this pivot motion to occur. Wouldn't you know it but the area of this rotation had the lobe cams that were there all the time right in front of my nose..but I never once saw them even though they were right there all the time. Once I added this piece to the chassis the initial rotation worked and I was on my way the understanding the next step. The old historical rover diagrams were very helpful but some parts never quite matched the videos or the actual rover. There was another piece on the rover, I don't know the name of it, but the extension rod actually hooks up to this bracket that sits between both seats. It sticks out through the hole in the rear chassis floor… amazingly clever design. This part helps hold the rover in place on the LM's side.
A few e-mails to Ron discussing the deployment details then led to him passing along my animations to his friend who was lead designer of the SSE. Roy Runkle reviewed my animations and told him they were very accurate. I was thrilled that I had actually figured out that part of the puzzle.
This project has been a thrill and honour for me. I have met so many great people over the internet and just recently I have met some face to face at the 12th Annual Great Moon Buggy Races in Huntsville. (you can take a look at some images and my thoughts on the past race). I am thrilled that some of my work appears on Eric Jones' Apollo Lunar Surface Journal. I hope to contribute more content in the future. I am grateful I can be involved with Apollo's history and add to the knowledge of this amazing time in history.
